In today's post I'm going to present a detailed guide to edit html / css of weebly websites. After reading and following this complete guide you will be able to extend the functionality of your website by editing or adding html / css code of your weebly websites. Firstly I'll describe how to access the weebly code editor , secondly I'll give an overview of template pages / header types / layout pages and finally how we can change the styles of different sections of our website.
Where is the Weebly Code Editor?
To access weebly code editor from your main weebly admin panel of your website:
Step 1: Click on the "Design" tab from top menu
Step 2: Click on "Edit Html / Css" button, located in bottom of left of your page
To access weebly code editor from your main weebly admin panel of your website:
Step 1: Click on the "Design" tab from top menu
Step 2: Click on "Edit Html / Css" button, located in bottom of left of your page

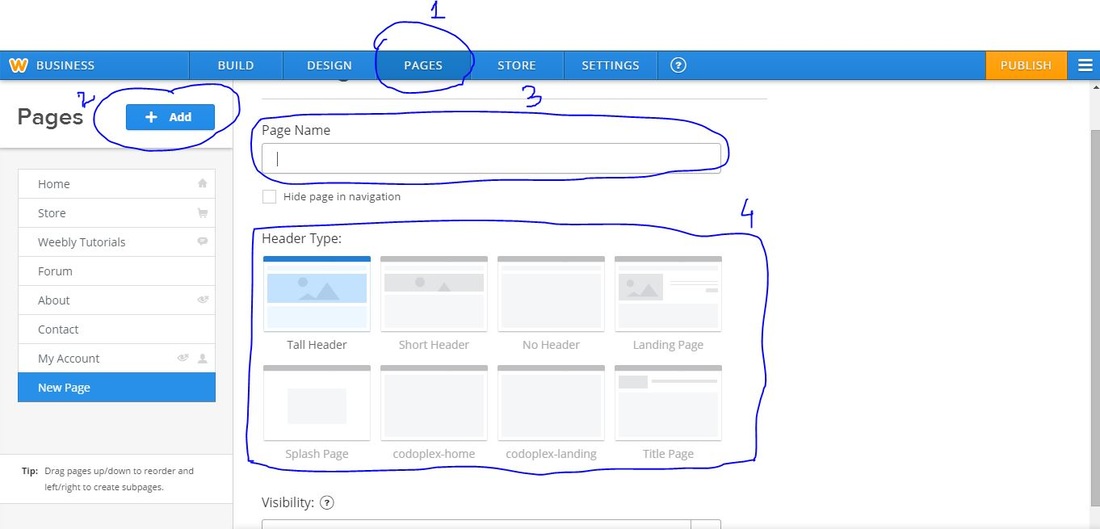
What are Weebly Template Pages / Layout Pages / Header Types?
Weebly Template Pages / Layout Pages / Header Types are mostly used interchangeably they are basically used for the same concept. A template page or layout page or header type is a predefined structure of how different elements or sections will look like on that particular page. In weebly every theme comes with different layout pages or header types like tall header layout, short header layout, no header layout, landing page layout, splash page layout etc. When we create a new page in weebly by using "Pages" tab from top menu of weebly dashboard, we can assign any template page or header type to that page.
Weebly Template Pages / Layout Pages / Header Types are mostly used interchangeably they are basically used for the same concept. A template page or layout page or header type is a predefined structure of how different elements or sections will look like on that particular page. In weebly every theme comes with different layout pages or header types like tall header layout, short header layout, no header layout, landing page layout, splash page layout etc. When we create a new page in weebly by using "Pages" tab from top menu of weebly dashboard, we can assign any template page or header type to that page.

Step 3: Now you are inside Weebly Code Editor where you can edit you html pages, css file and add images etc.
Try it out by creating a new page and assigning different layout pages or header types to that page to see the difference in the orientation or styles of different elements or sections of that page.
How to create a new Template Page / Layout Page / Header Type?
To create a new template page:
Step 1:
From your 'Weebly Code Editor', click 'New Header Type'.

Step 2:
You will get almost blank layout page with some predefined basic template tags of weebly. You can rename it like 'my layout' etc.

Step 3:
Now select another template page or header type from existing list like 'no header' and copy its code. Now paste the code, copied from 'no header' layout, inside your newly created layout page and change the class name inside body element from 'no-header' to 'my-header' or something else. This class name will be used to style different elements of this template layout page. (see circled line in code)
Now select another template page or header type from existing list like 'no header' and copy its code. Now paste the code, copied from 'no header' layout, inside your newly created layout page and change the class name inside body element from 'no-header' to 'my-header' or something else. This class name will be used to style different elements of this template layout page. (see circled line in code)

How To Change Styles of New Header Type or New Template Page?
Now that you have created a new template page and now you want to change the styles of different sections and elements of this newly created template page. So that it looks different than the other layout pages. Let's suppose that on newly created template page named as 'myheader.html', you want to change the background color of banner and make it look different from other template pages. To do this in css file i.e 'main_style.css' you will access the class of banner as follows:
.my-header .banner-class-name {
//your styles here
}
Here '.my-header' is the class that we have assigned to the body element of newly created template page and '.banner-class-name' will be the class name that your theme is using for banner.
If you have any question or confusion you can ask in the comment box below !


 RSS Feed